You’ve come up with an excellent concept, researched it well, written the material, and even made some videos.
What comes next, then? You now need a method for managing and delivering your fantastic course. You should utilise a time-saving learning management system (LMS) to accomplish it efficiently so you can concentrate on producing excellent material.
You have undoubtedly heard of Teachable if you have been researching LMS choices.
These days, it’s rather common among those who create courses. To assist you in determining whether Teachable Review is the correct choice for you, I’ve included a summary of it.
Content Outline
What is Teachable?
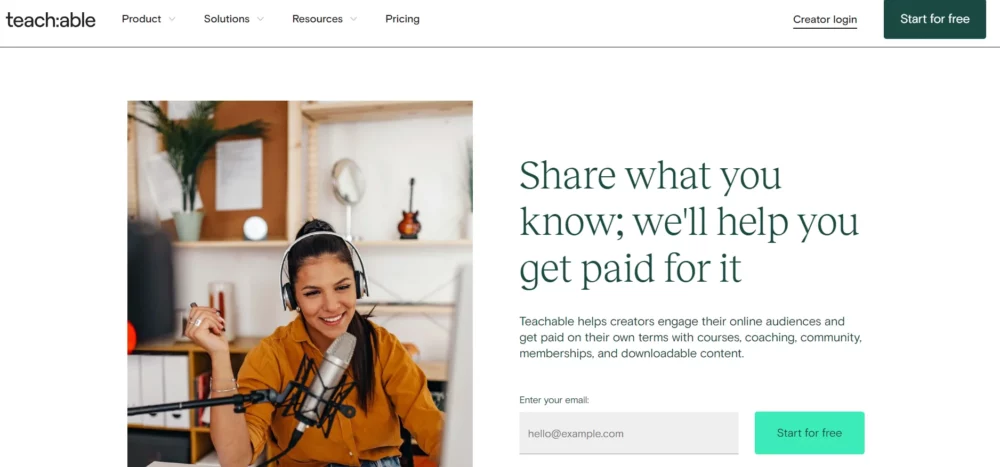
Teachable is a platform designed for individuals eager to create and sell online courses. Launched in 2013 under the name Fedora by course creator Ankur Nagpal, it has since evolved into Teachable.
The platform supports course creators by taking care of aspects like course hosting, sales tracking, and payment processing. Today, it serves over 100,000 instructors and has facilitated the sale of over $500 million in courses to more than 18 million students.
Teachable Pricing
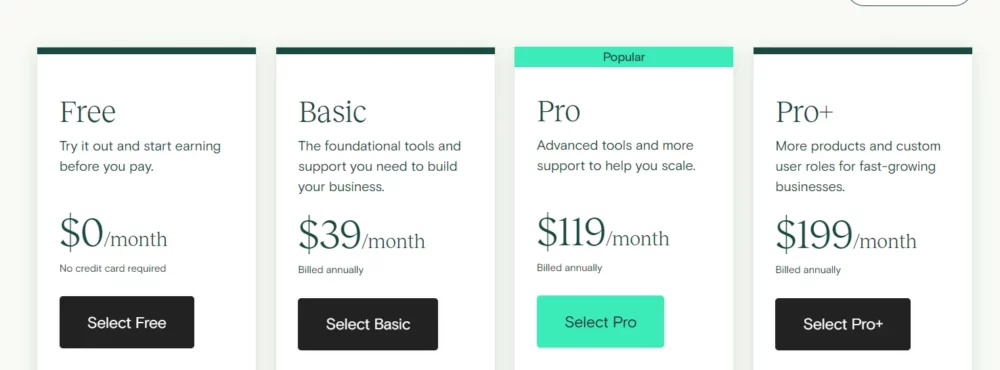
Teachable offers different plans to suit different needs and budgets:
| Plan | Cost | Transaction Fee | Published Products | Key Features |
|---|---|---|---|---|
|
$0/month | $1 + 10% | 1 product of each type | No-code course builder, student referrals, teachable:pay integration |
|
$39/month (annually) | 5% | 5 products of each type | Community access, 1 membership tier, email marketing, coupons, custom domains |
|
$119/month (annually) | 0% | 50 products of each type | Unlimited membership tiers, affiliate marketing, live chat support, upsells, API access, 5 admins |
|
$199/month (annually) | 0% | 200 products of each type | Custom user roles, 200 courses, 200 coaching products, 200 digital downloads, 200 product bundles |
|
Custom Pricing | 0% | Customizable | Custom pricing, migration assistance, white-glove onboarding, dedicated success manager |
Teachable Enterprise is designed for businesses needing advanced features and personalized assistance.
It includes all Pro+ Plan features plus:
- Custom Pricing: Tailored to your organization’s needs.
- Migration Assistance: Smooth transfer of courses and data.
- White Glove Onboarding: Personalized setup and training.
- Dedicated Success Manager: Expert support for scaling and success.
Ideal for corporations, educational institutions, and high-growth creators, Enterprise ensures top-tier tools and support.
- Contact sales to customize your plan.
What Percentage Does Teachable Take?
It’s important to comprehend the fees Teachable charges if you’re considering employing them for your classes. In addition to its standard price, Teachable charges a %, which may not seem like much, but over time, it might affect your revenue.
Depending on your Teachable plan, the precise proportion and costs change. International sales may incur a price of up to 3.9% + 30 cents every sale, in contrast to the 2.9% payment processing fee plus 30 cents per transaction for the basic plan.
All plans are subject to a $15 chargeback fee, and there is a 4.4% + 30 cents per sale cost for international PayPal purchases.
Teachable collects a 5% charge from each sale you make in addition to these transactional costs; the transaction fees do not cover this fee.
This can soon mount up and reduce your income.
But the Pro and Professional plans are more expensive because they don’t charge extra for transactions. Even though they are more expensive each month, they can save you money over time, particularly if you’re selling a lot of things.
When choosing whether to utilise Teachable for your course company, these costs are crucial to take into account.
Who Teachable Is Best For?
Teachable is the perfect platform for educators and entrepreneurs aiming to distribute their knowledge to a global audience. Here’s a detailed overview of who can benefit most from Teachable:
- Consultants: With Teachable, consultants can engage with clients around the world without heavy marketing or the necessity of face-to-face meetings. It serves as an affordable method to provide services to a wider clientele.
- Coaches: Teachable allows coaches to market and charge for their services on a global scale. Integrations with tools such as Zoom and Calendly facilitate smooth scheduling and payments, enhancing the coaching experience.
- Speakers: Teachable enables speakers to compile their expertise and present it virtually, eliminating the need for physical events. The integration with Zoom supports online presentations, offering flexibility and access to larger audiences.
- Authors: Teachable equips authors with marketing and sales capabilities to develop and expand their businesses independently. Authors can effectively promote their books through the platform, scaling their operations without solely depending on publishers.
- Trainers: Trainers can use Teachable to display their offerings through pre-recorded workshops and live webinars. By integrating with third-party streaming platforms, trainers can share knowledge and sell products efficiently.
Teachable’s user-friendly interface ensures that even those with limited technical skills can navigate it easily. A Pro subscription or higher allows users to personalize their course websites with branding features, establishing a polished online image.
Regardless of being a yoga instructor, musician, financial advisor, artist, or an expert in any area, Teachable equips you with the necessary tools to effectively convey your expertise and passion to learners globally.
How to create your course?
Once you’ve set up your school on Teachable, you’ll have the option to create your first course. However, you don’t have to do it immediately. You can choose to do it later whenever you’re ready.
Let me show you step-by-step how to create your course now.
1. To begin your journey, simply head over to your Teachable admin area and look for the “Courses” tab in the side menu. If it’s a bit tricky to find, no worries! Just click on the plus icon (+) next to “Products” and choose the “Course” option. After that, you’re all set to move on to step 3!
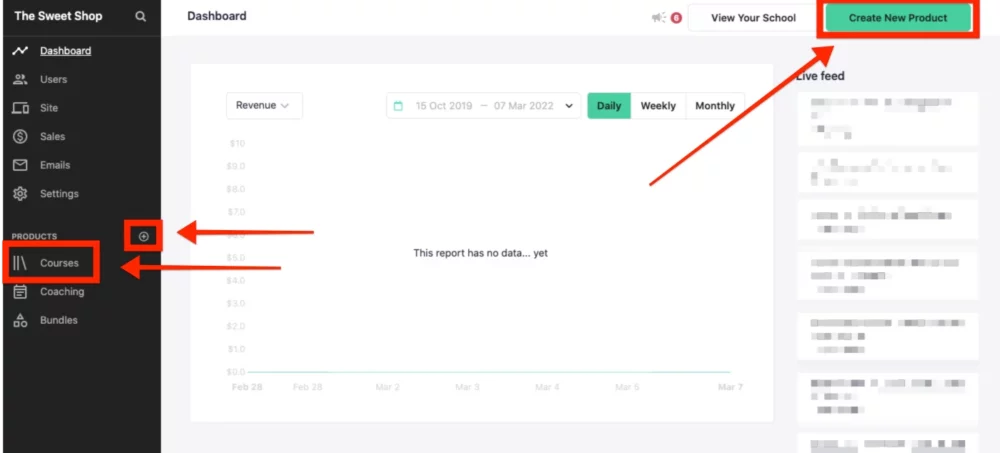
2. In the top right corner, click the New Course button.
3. By using this option, you will be taken to the new course area, where you can input the Course Title and select the author of the course.
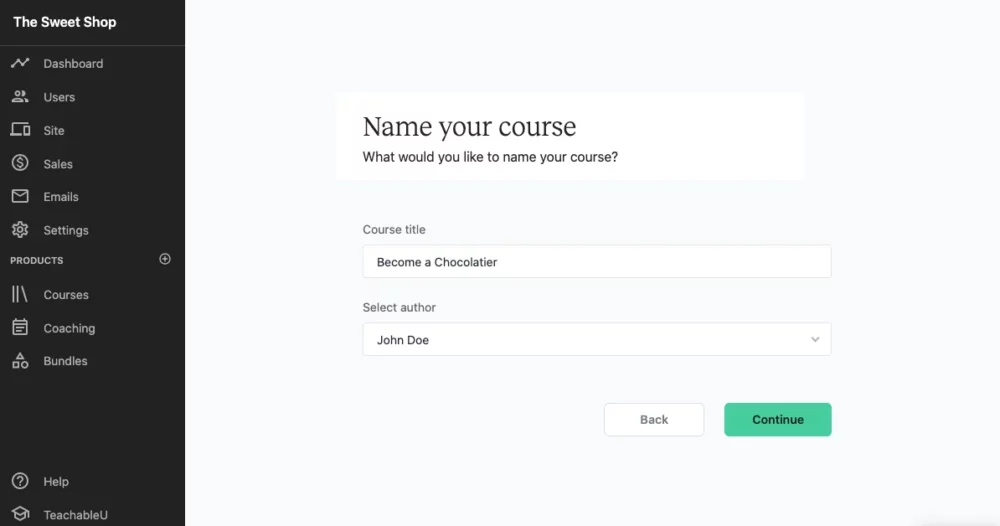
4. Click the Create Course button once you have filled out the course information.
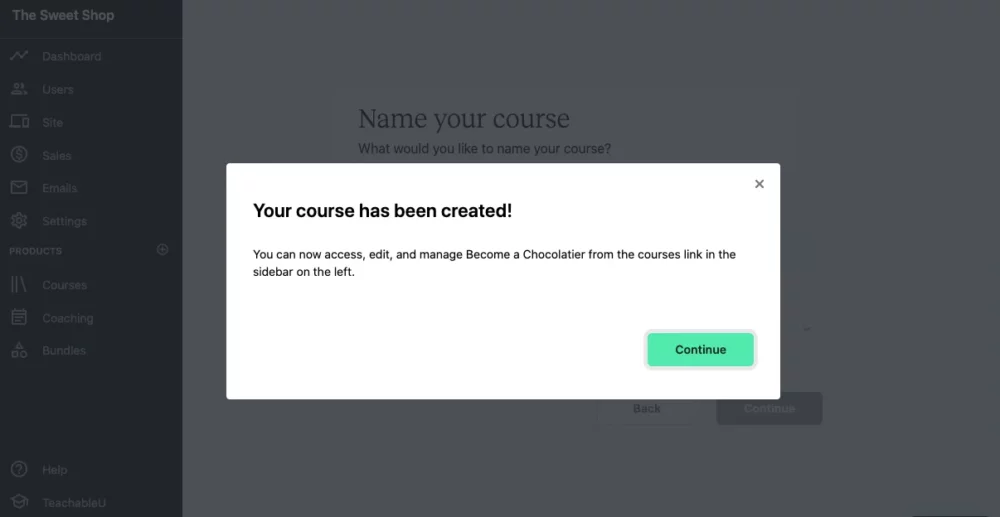
5. You’ll see a small window confirming that your course has been successfully created and added to your Courses tab. Just click on “Continue” to proceed.
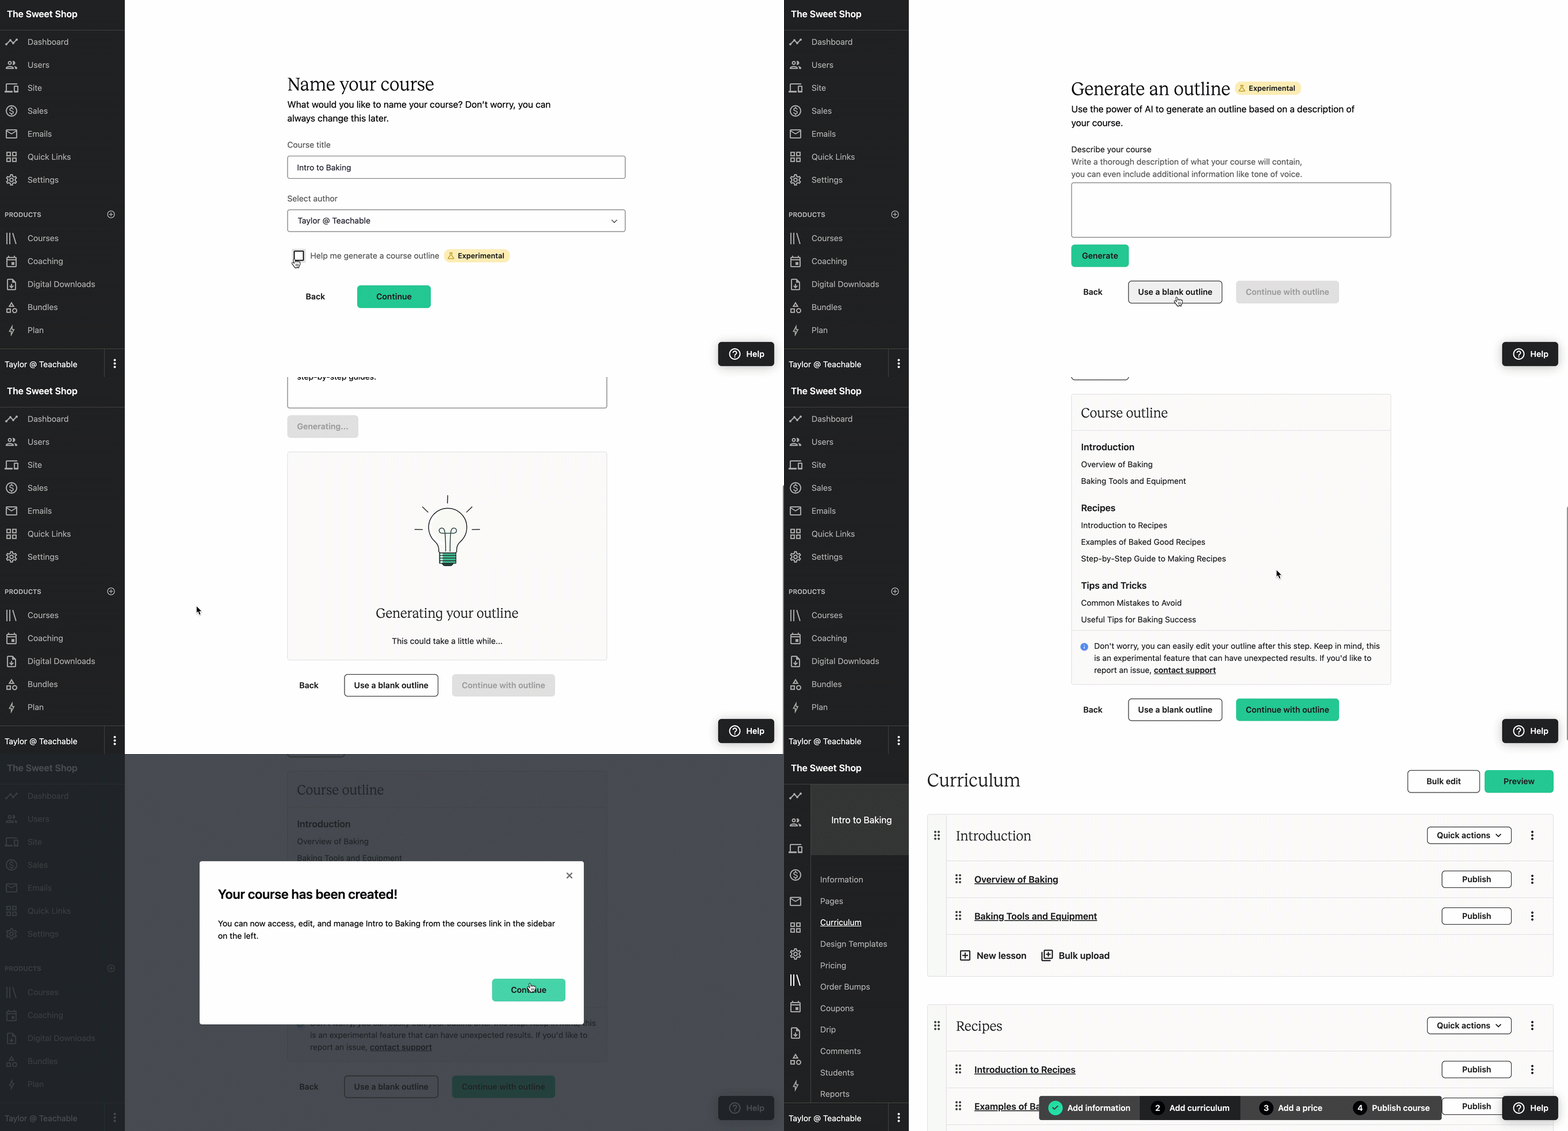
7. You’ll be taken to the Curriculum tab, where you can add the content for your course. If needed, you can always go back to the Information tab by clicking on it.
Course outlining tools
To create a course outline efficiently, utilize the AI outline generator tool. Here’s a step-by-step guide:
- Check the box that states, “Help me generate a course outline.”
- Provide a brief description of your course topic in the designated text box. For example, for a baking course, you might enter: “Preparing baked goods with tools, recipes, and step-by-step guides.”
- Click the “Generate” button to create your outline.
- Review the generated outline**. If it meets your expectations, click “Continue with an outline”. Remember, you can edit the outline later if needed.
- If you’re not satisfied with the outline, consider entering a different course description and clicking “Generate” again.
- Alternatively, if you don’t have a specific description, you can select “Use blank outline” to bypass this step and proceed directly to crafting your course curriculum.
Publish and Preview
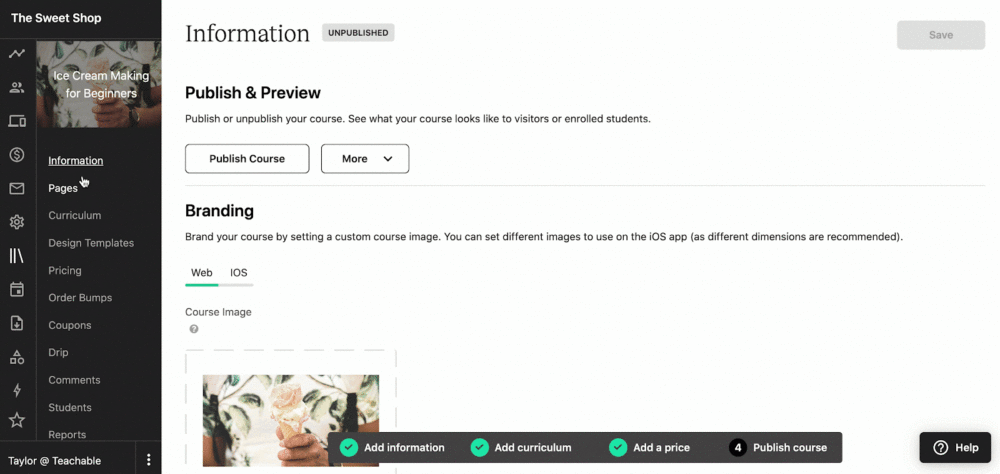
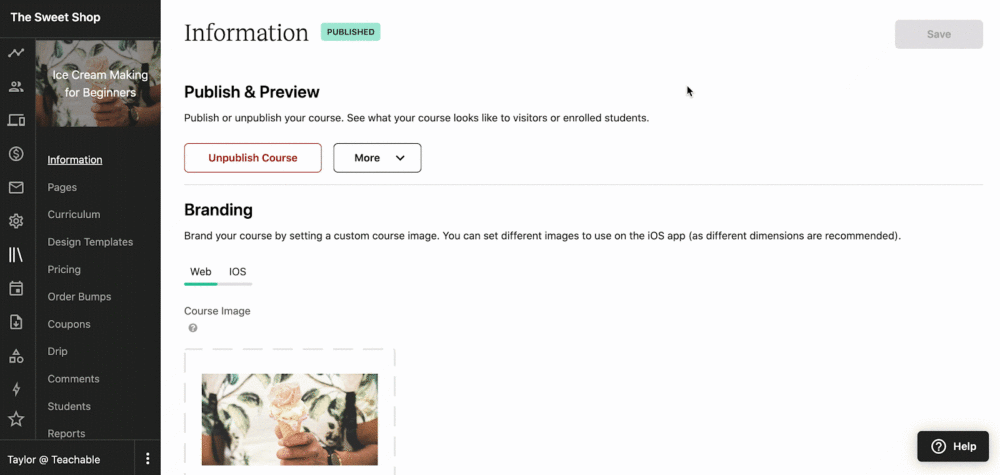
You may control several parameters, such as publishing, previewing, copying, or removing your course, in the Information tab.
Making your course available for purchase and enrolment by new students is known as publishing it. You can only purchase or enrol in courses that have been published.
Click the “Publish Course” button to make your course public. Under the course curriculum tab, a pop-up window will ask if you wish to publish the course and any unpublished lectures. If you select “Yes,” students will be able to enrol in your course.
IIf you select “Yes, publish all,” the entire course will be published, which includes sales, checkout, and thank you pages, as well as all lecture pages. However, if you choose “No, just publish the course,” only the course and its related pages will be published, leaving any unpublished lectures in your Curriculum hidden.
You also have the option to click “Cancel” if you prefer not to publish the course at this moment. Additionally, you can take further actions by clicking the More dropdown button next to the Publish Course button.
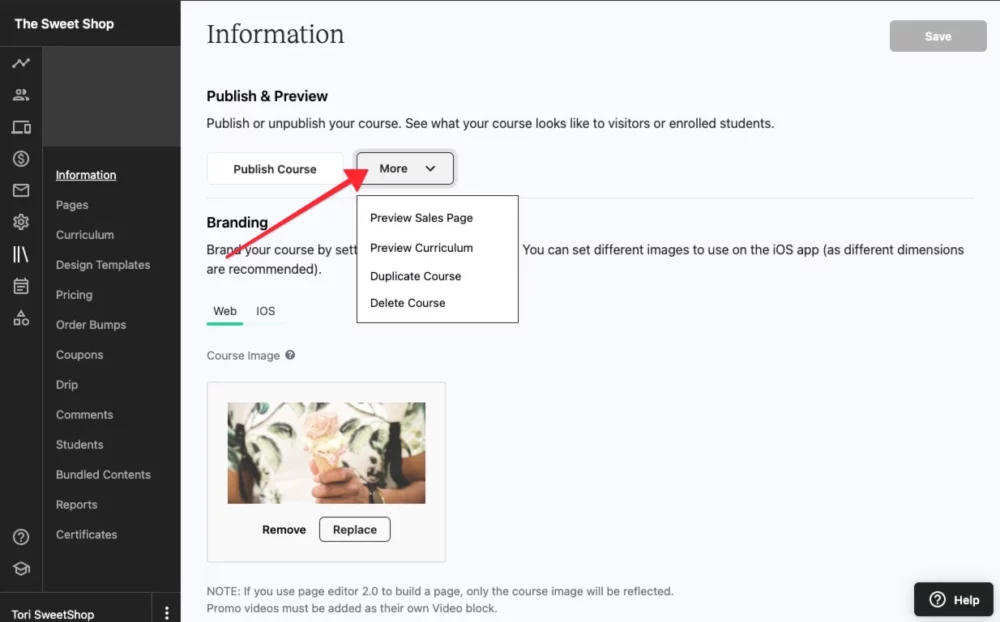
You can take the following extra steps from the Information tab:
Preview Sales Page: This allows you to preview how a student would initially see the sales page for your course.
Preview Curriculum: This allows you to preview how students will perceive the course material once they have purchased it.
Duplicate Course: Using this option, you may create a duplicate of your Teachable course in your account. Everything in the course, including lectures, media, pages, settings, and author assignments, will be duplicated. You can edit any of these after duplication.
Delete Course: This option permanently removes the course from your Teachable account. Be cautious because this action cannot be undone.
Product Visibility
There is a toggle for product visibility in each course.
Products that are listed in your product directory are visible to anybody who visits your school and has the option to purchase or sign up for them. Conversely, the directory does not display hidden products.
Students may still access and buy concealed things, but only if you provide them with a direct link to the checkout or sales page.
Branding
You may alter how your school looks in the Branding area. A unique thumbnail logo that you upload will appear on the website of your institution and other locations. You may also include a promotional video if your school is 1.0.
Since different sizes are advised for the best presentation, you may also specify alternative photos especially for the iOS app.
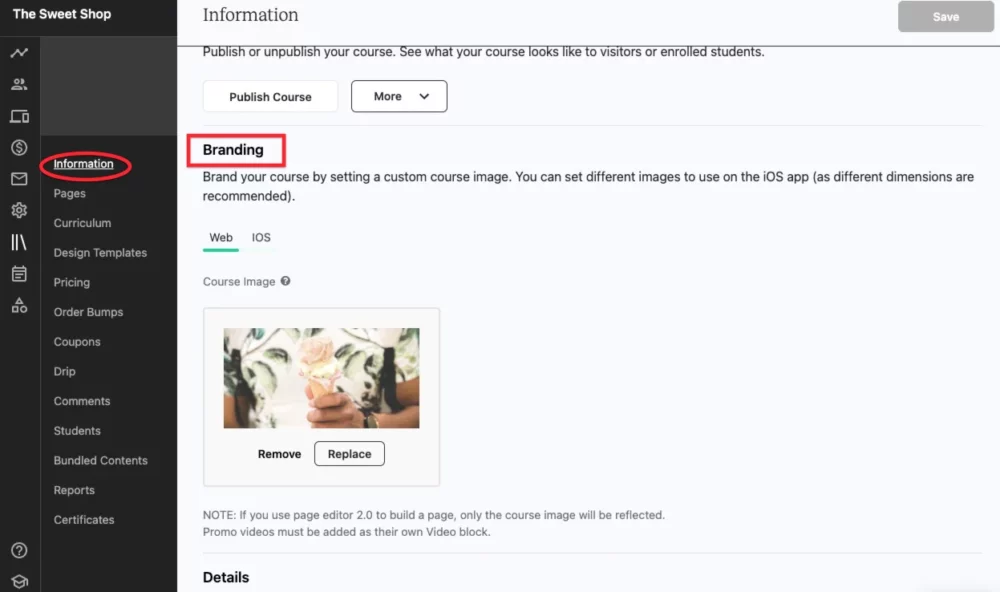
Course Image: This little image serves as a representation of your course across the entire institution. When students are in the course, they will see it on the sidebar and the course list. A JPG or PNG file with 2560×1440 pixel size is ideal.
Promo Video (1.0 schools only): This is a little advertisement that shows up at the top of the sales page for your course. Either a 1920×1080 or 3840×2160 video file (in MP4, M4V, or AVI format) with a maximum size of 2 GB is advised. For best results, it’s also a good idea to compress your video files.
Advice: Compressing the files is the best way to lower the size of 4K or 1080p videos without sacrificing quality. Handbrake is one tool that can help with this.
Click on the iOS tab to set photos exclusively for the iOS app. For app thumbnails, use a 300×300 JPG or PNG file; for background graphics, use a 1080x607px JPG or PNG file.
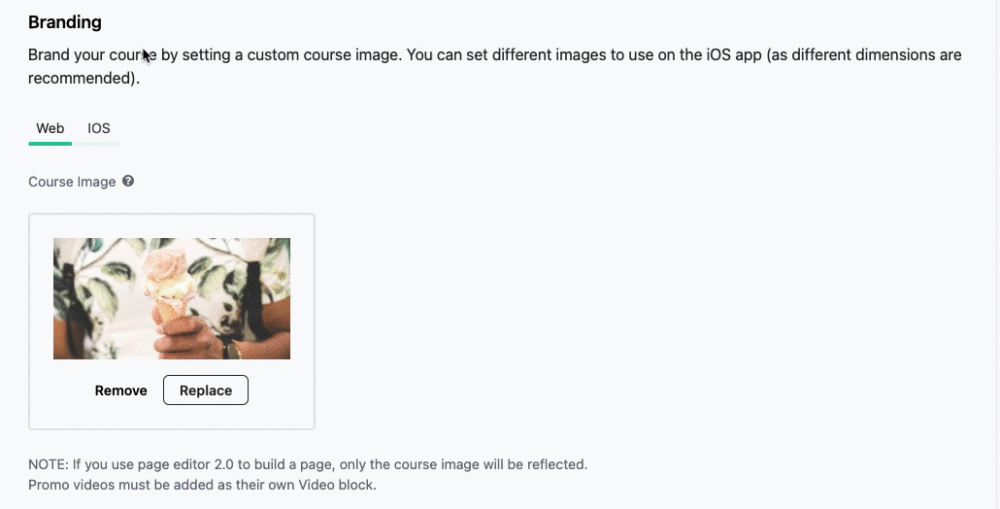
Click the Change button to update any images or videos you’ve uploaded in the Branding section. Click the Reset link to remove.
Details
You can edit the information that will appear across your school in the Details section of your course’s page. The following information can be modified here:
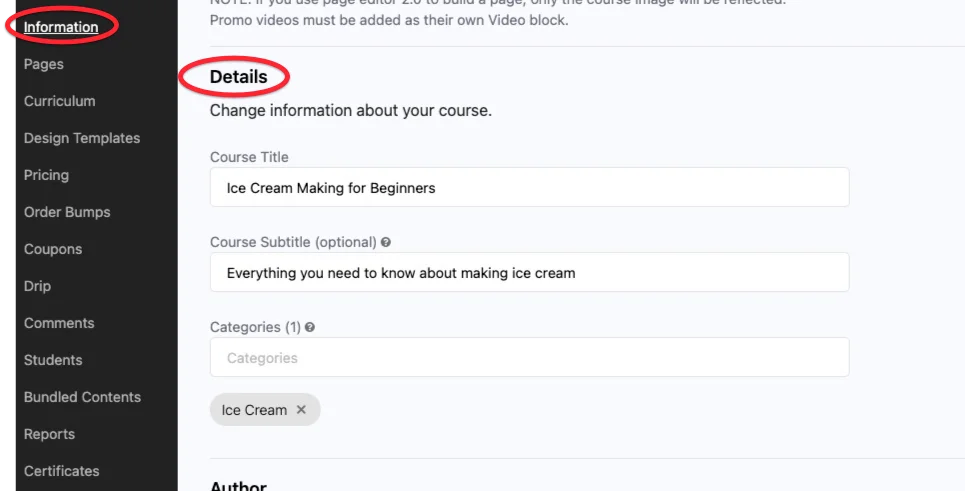
Course Title: This is your course’s primary name, and it will be seen prominently across your Teachable school.
Course Subtitle: You may use this to give further information about the topics covered in your course. In your course directory, the subtitle will be shown beneath the primary course title.
Category: When students browse your school’s All Products page, categories help them find what they’re looking for and help you organise your courses.
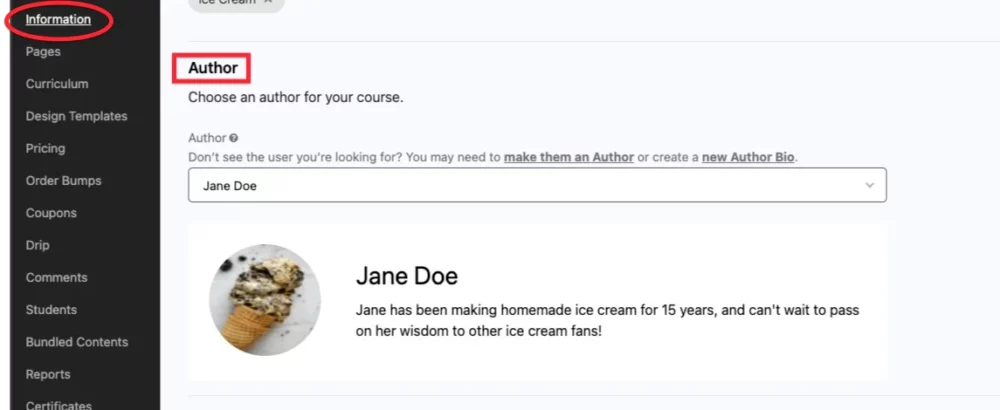
Author
The author of your course at your school can be identified in the Author section. Both the Featured Products section and other pages, such as All Products and My Products, will display the author’s name.
Additionally, the My Instructor page in the course will include the author’s name, photo, and biography.
You may either designate an author or leave the bio blank in the dropdown menu:
Authors: A particular user or author account at your institution is associated with the bio. This implies that the linked user has access to an author dashboard and is eligible to get a portion of the sales proceeds. If you would rather not have a distinct author account for your product, you can choose from the owner bios that are also displayed here. Author revenue shares are not available to owners.
Author-less bios: The bio is not connected to any specific user or author account at your institution. This indicates that there isn’t a distinct user account needed to administer the course or get a revenue split.
After making any changes, don’t forget to save them.
Search engine optimization (SEO) (Page Editor 1.0)
Note: Only courses created using Page Editor 1.0 are eligible for this section. You may modify the course information (such as the URL, page title, and description) for Page Editor 2.0 courses by going to your sales page settings. Study up on the differences between Page Editor 1.0 and 2.0.
To improve the visibility of your course’s sales page on search engines, you may make changes to key course data under the SEO area. Keep in mind that you can only see this section if you are using the outdated page editor. The SEO settings for your page may be accessed in the page editor itself if you’re using the updated version.
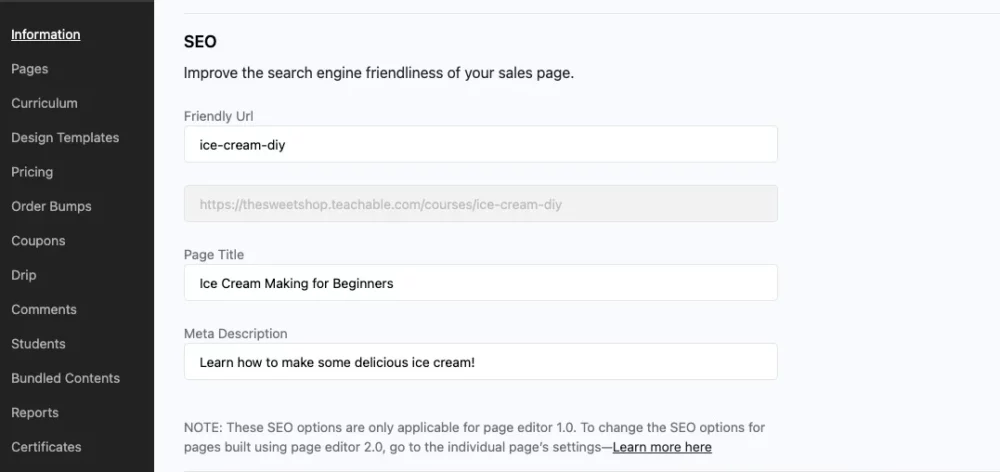
Friendly URL: A friendly URL is an easy-to-understand web address that contains terms that explain the webpage’s content. By simplifying the page’s content for both visitors and search engines, it aids in search engine optimisation (SEO).
Page Title—When someone searches for your webpage, the page title shows up in search engine results. It lets visitors know what to anticipate from the page.
Meta Description: The content of your webpage is summarised in the meta description. It functions similarly to a brief sales presentation and shows up in search engine results beneath the page title. An effective meta description urges consumers to click on the link to visit your Teachable school and is typically no more than 160 characters long.
Course compliance
For schools using the Professional plan or higher, you can set compliance rules for each lecture within the Information tab of your course.
These rules specify requirements that students must meet before they can move on to the next lecture.
Default pages
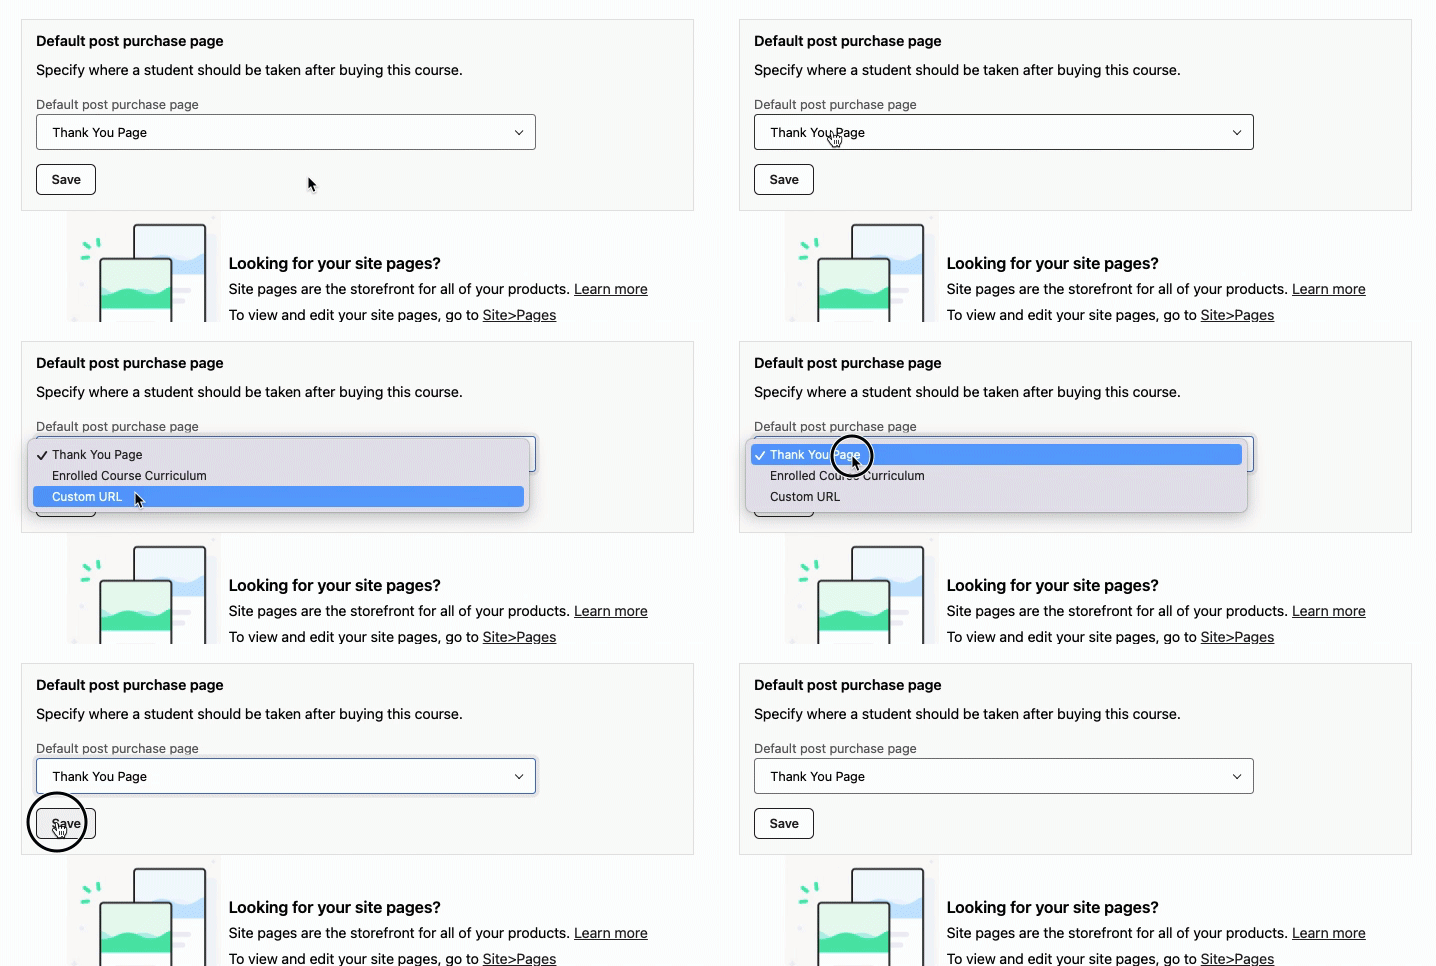
You may choose where students will go from the Post Purchase Page option on the Sales Page page after purchasing your course. You may want them to bypass the thank-you page and go straight to the course content for easier access.
After students check out, you can reroute them in one of three ways:
- Thank-you page: After making a purchase, students get at the thank-you page.
- Enrolled Course Curriculum: The page with the course curriculum is displayed to students.
- Custom URL: If you provide a specific URL in the Custom Post Purchase Redirect URL section, students will be sent there.
Layout settings
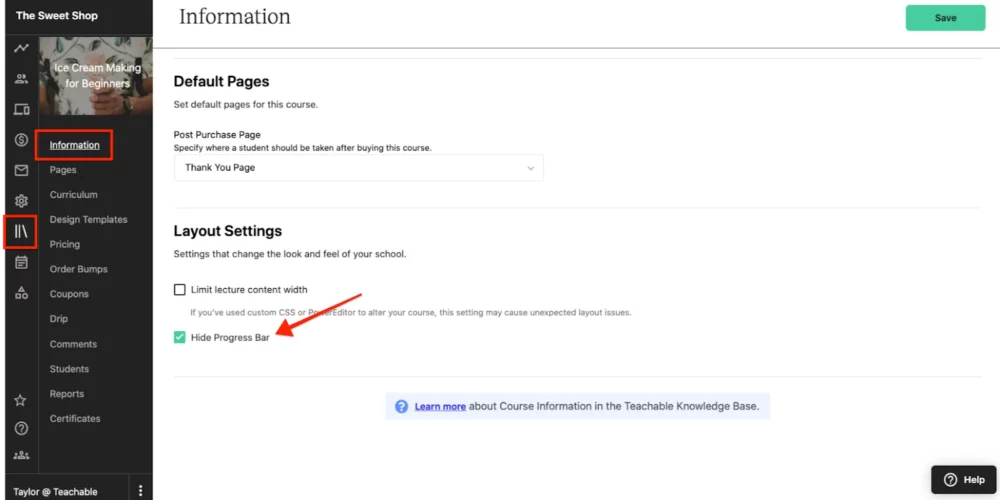
Check the “Limit lecture content width” box to change the width of the lecture content on course pages. This establishes the content width at 760 pixels for schools built before to June 2, 2022. The lecture content width is already set to 760px if your institution was established after this date, thus this setting won’t be accessible.
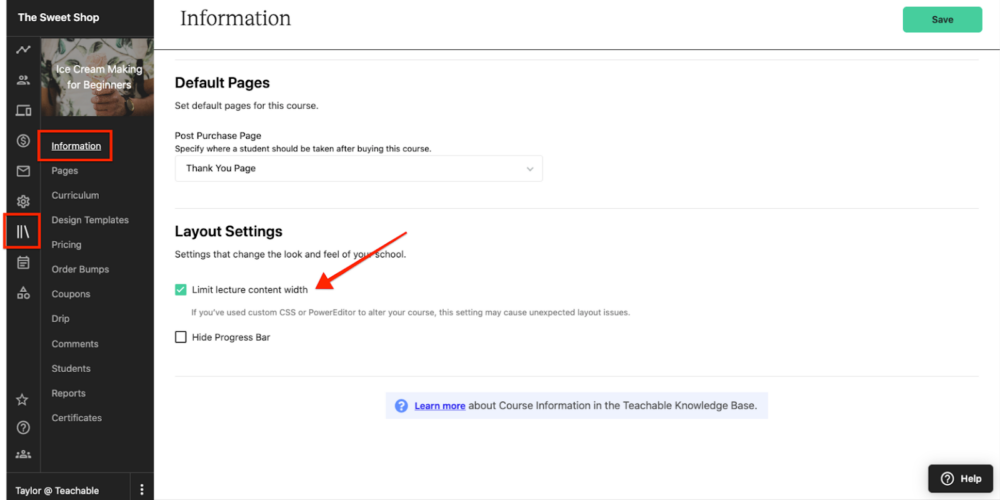
You may make sure that your lecture resources, including files, text, and videos, don’t take up too much space on your students’ screens by adjusting the lecture content width to 760 pixels. This ensures that your information is readable regardless of the browser window’s size.
Hide Progress Bar
Students see a progress bar in their course view that indicates how much of the course they have finished. For every course, you have the option to conceal this progress indicator from the student view.
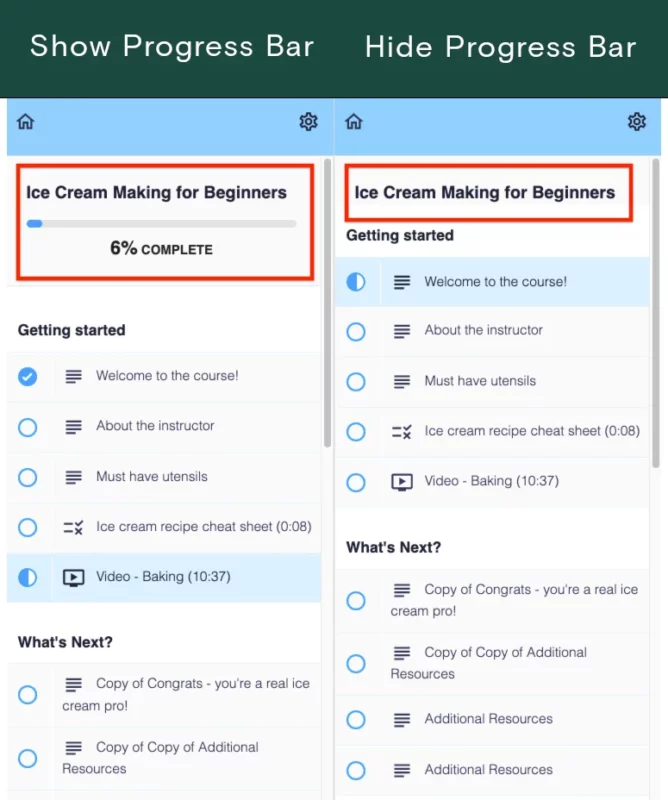
To hide the progress bar from students, check the Hide Progress Bar checkbox. Once you’re done, click Save.
Delete a course
Let me show you step-by-step how to delete a course:
- Go to the Publish & Preview section at the top of the Course > Information page.
- Click the More button next to the Publish course button.
- Choose Delete Course from the dropdown menu.
- A popup screen will appear, asking for confirmation of the action.
- In the pop-up window, click Delete.
Remember: Deleting a course cannot be undone. Once you confirm the deletion, the course will be permanently removed and cannot be recovered.
Teachable Integrations
1. Integrations & Applications:
You may combine your Teachable school with a number of third-party services to improve its usefulness. Through these connectors, you may increase the functionality of your online course platform, automate operations, and expedite procedures.
2. Integrations with Third Parties:
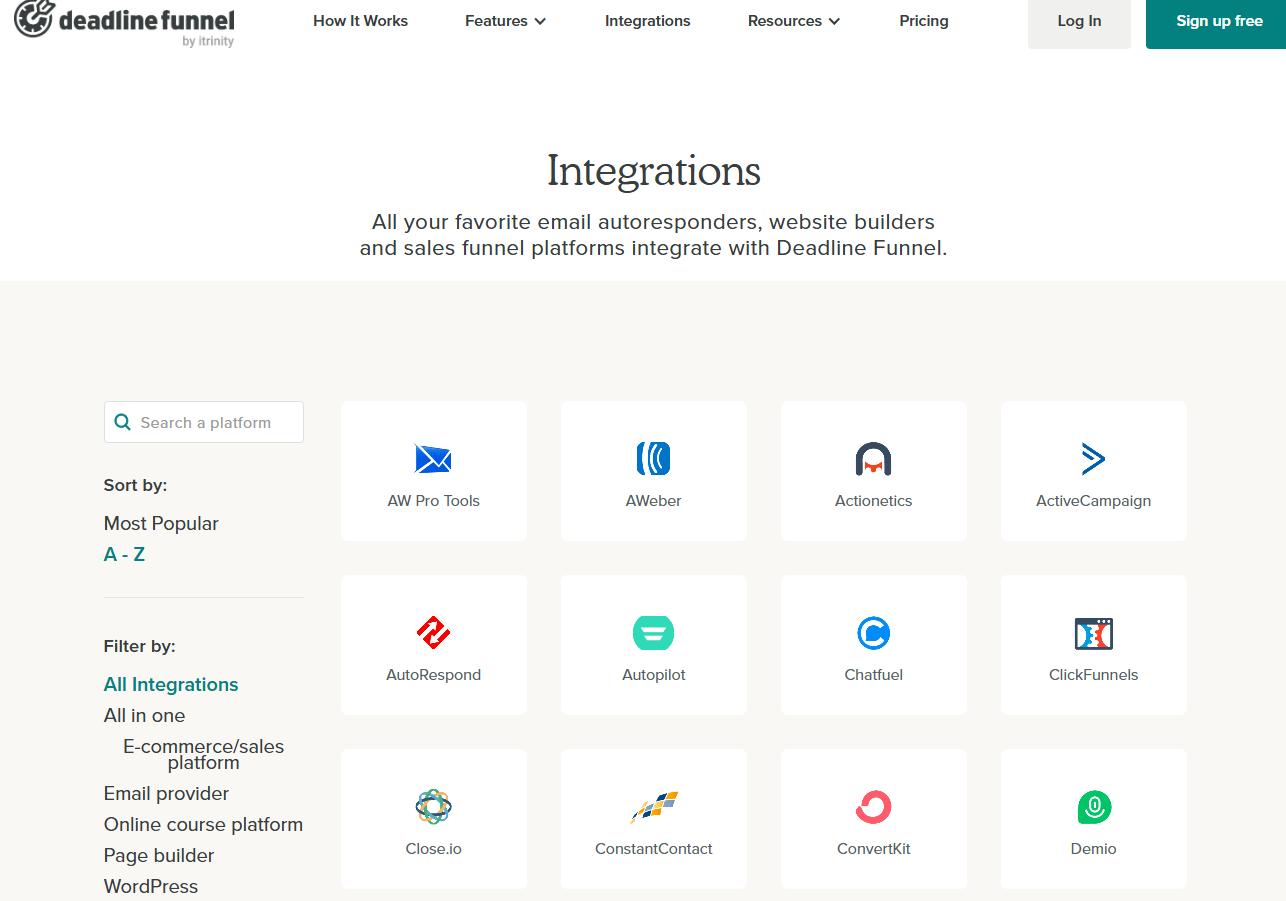
Popular third-party services like Zoom, AWeber, ActiveCampaign, ConvertKit, Deadline Funnel, and others may be integrated with Teachable. You can link Teachable to other platforms you use for automation, webinar hosting, email marketing, and sales funnel management thanks to these connectors.
3. Overview of App Hub:
You can easily explore and select the connections that best fit your needs with Teachable’s App Hub, which offers an overview of all the integrations that are accessible.
The App Hub offers pertinent choices for using webhooks and APIs, automating user email unsubscriptions, and integrating with email service providers.
4. Integration with Zapier:
You can integrate Teachable with thousands of other applications and services with Zapier, a robust automation platform. It enables you to automate “Zaps,” or processes, that cause Teachable actions to be triggered in response to events in other programs.
5. Automate Unsubscriptions to User Emails:
You can automate the management of user email subscriptions by linking Teachable with email service providers and automation tools such as Zapier. This guarantees that users’ activities with your Teachable courses will determine whether they are added to or deleted from mailing lists.
6. API & Webhooks:
Additionally, Teachable offers webhooks and an API (Application Programming Interface) to developers that wish to expand the platform’s capabilities or create unique connections.
While the API lets developers work with Teachable programmatically, accessing and changing data as needed, webhooks let Teachable send real-time messages to external systems.
Teachable for Business:
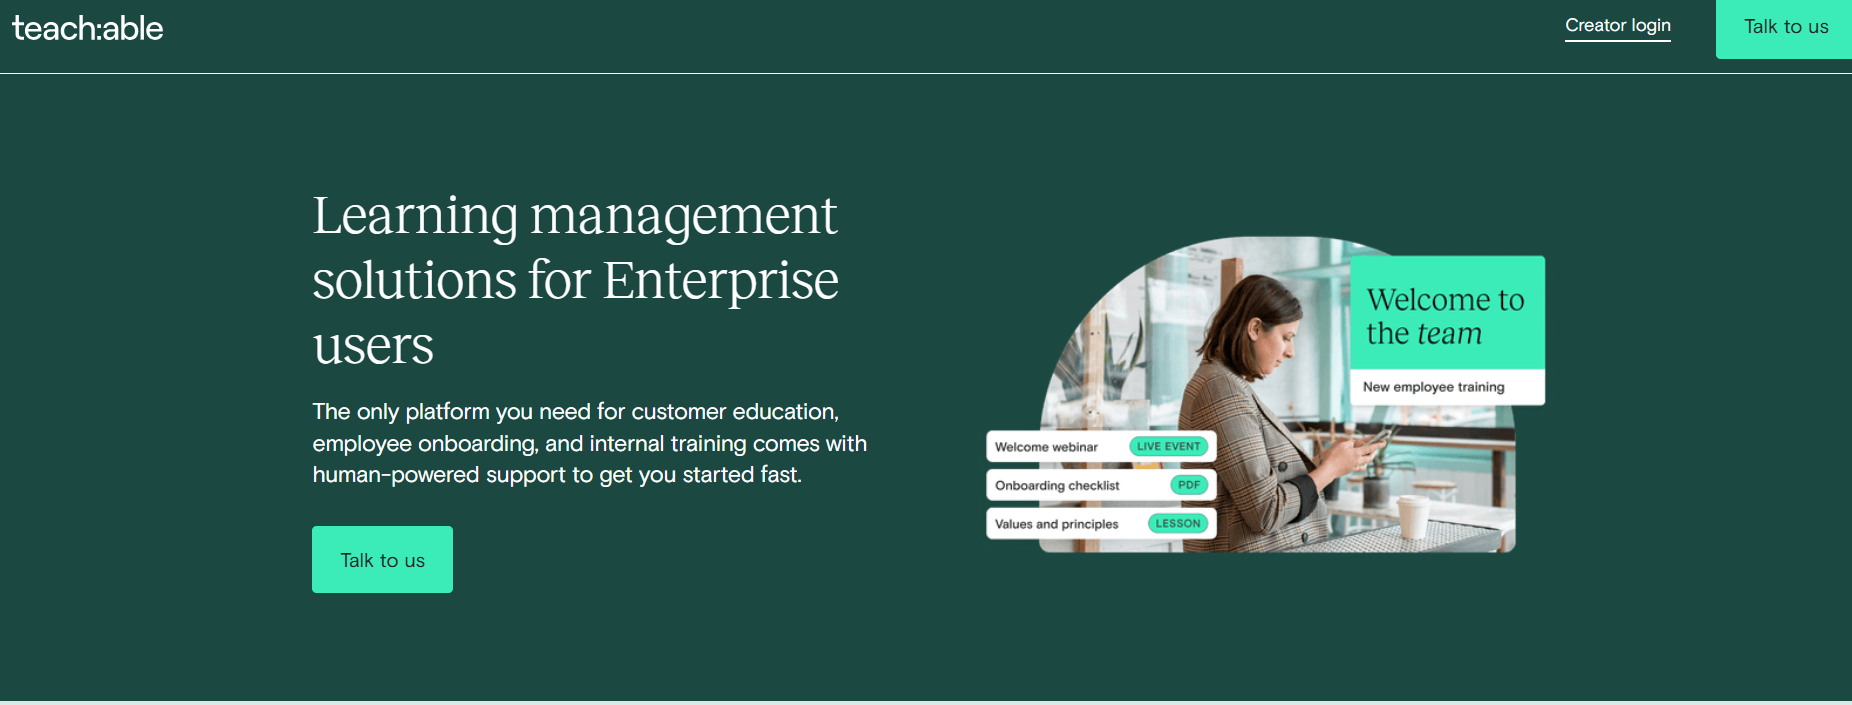
“Teachable for Business” is a customised solution for companies wishing to use online education to train clients or engage employees. With capabilities like these, our platform makes it simple for businesses to create and manage online courses.
- Branded Learning Experience: Companies may use their brand to customise the learning experience.
- Scalability: Made to instruct groups of any size, no matter how big or little.
- Advanced Analytics: Track engagement, course completion rates, and student progress to have a deeper understanding of the impact.
- User Management: Assemble students into groups to facilitate the management of several teams.
- Integrations: It can easily connect with your current procedures because it is compatible with technologies like Zapier and custom APIs.
- Teachable for Business offers an advanced and intuitive online learning environment with the goal of streamlining employee or customer training.
Teachable Customer Care
One of Teachable’s advantages is its first-rate customer service.
The business is committed to supporting its users and offers assistance with any problems they could run into. Your plan determines how much help you get.
For example, live chat help is available for the Professional and Business subscriptions, but email support is included of the Basic plan.
Customers have praised Teachable’s customer service for being friendly and quick to respond. The support staff is competent and able to help with a variety of problems.
Additionally, Teachable offers a multitude of materials to assist users. A thorough knowledge base with articles, guides, and frequently asked questions is part of this. All users have access to these resources, which are a wonderful place to start if you need help.
Teachable also features a community forum where users may interact, exchange tips, and resolve common issues.
This forum is a great place to work with other Teachable users and learn from others.
Teachable offers various resources to help users understand the platform:
- Documentation: Complete instructions and tutorials to assist with managing courses, using the platform, and troubleshooting.
- Knowledge Base: An extensive collection of tutorials, articles, and frequently asked questions that provide in-depth details on platform functionality.
- Video Tutorials: Detailed video instructions that cover everything from account setup to course creation and promotion.
- Community Discussion Board (Teachable:hq): a stimulating environment where users can communicate, exchange stories, and get advice from Teachable staff and peers.
- Email Support: Reliable email support for platform problems and user inquiries.
- Live Webinars: Engaging presentations with live Q&A chances hosted by professionals on subjects including course development and business expansion.
- Blog: An extensive collection of articles and advice to assist users in growing their enterprises on subjects including marketing, entrepreneurship, and course development.
What do I think Teachable to improve?
Technical site building: Teachable’s tiny input boxes and restricted copy-and-paste capabilities make it difficult for many users to develop sites, particularly when it comes to creating one-click upsell pages. For sophisticated template modifications, non-technical users might need a web designer.
Limited customisability: Teachable’s templated method makes creating courses easier, but it doesn’t allow for much personalisation. It is challenging to stand out from other authors because every material has the same layout and the system’s templated pages provide little customisation choices.
Transaction fees: Every transaction costs money under both the basic and free plans, and these costs can mount up over time. It might not be cost-effective to upgrade to more costly plans in order to avoid these costs, especially if you don’t want the extra capabilities.
Pros and Cons
Pros
- Flexible plans, including a free tier, with options for monthly or annual savings.
- Easy setup with design templates and automated payment/registration processes.
- Supports diverse content formats like PDFs, images, videos, and audio.
- Built-in secure payment system with integration options for popular gateways.
Cons
- Challenging site-building process with small input boxes and limited copy-paste functionality.
- Limited customization with templated pages and minimal flexibility.
- Transaction fees on all plans, even the free and basic ones, which can add up over time.
FAQs
🤔Is Teachable trustworthy?
Yes, Teachable is a trustworthy company. Established in 2014 by Ankur Nagpal, it boasts over 170 employees serving more than 70,000 course creators.
👀Is Teachable compatible with mobile devices?
Absolutely! Teachable courses are fully mobile responsive, ensuring seamless viewing on any smartphone, tablet, or computer.
❓Who utilizes Teachable?
The New York Times, Shopify, and Penn Law are just a few of the prominent entities that use Teachable, including individual course creators like Pat Flynn.
🧐Does Teachable impose transaction fees?
Yes, Teachable applies a 5% transaction fee on its Basic plan. However, the Professional and Business plans do not have transaction fees.
👉Is Teachable considered an LMS?
Yes, Teachable serves as a web-based Learning Management System (LMS). LMS software is employed to deliver training courses and educational content in written and video formats.
Quicklinks
Conclusion: Is Teachable Right for you?
Are you sure if Teachable is the best option for you? Teachable is renowned for its safety and offers many fantastic features, such as user-friendly templates and the ability to handle a lot of technical tasks for you.
However, there are drawbacks as well. It can be difficult to use at times, you and your pupils might have to pay transaction fees, and you can’t customise everything.
Keep in mind that your enthusiasm and commitment to your course are what matter most, regardless of whether you choose Teachable or another platform.
